I am thrilled to be a part of Jill’s Kombucha Challenge here at Real Food Forager to share my method with you – the kombucha continuous brew method!
First, let me introduce myself. I am Dina-Marie, the author of Cultured Palate blog, mother of 10 children (7 of whom are still at home!), wife to the same man for almost 29 years (and I still love him!) and a kombucha enthusiast. As you can probably guess, with 7 children still at home, we go through a lot of kombucha at our house!
So, if you are up to step 2 in the Kombucha Challenge, then you are probably already hooked, not only on the health benefits of kombucha, but also the taste. Now, it is time to begin making it at home. At $3 to $4+ per bottle, if for no other reason than economics, it is time to learn the art of making kombucha!
Continuous Brew Kombucha Gives Better Quality
When I began making kombucha a couple of years ago, I used 1 gallon glass jars and covered them with cheesecloth which I secured with a rubber band. The problem was, there is only so much room on the top of a refrigerator for jars and I had reached my limit! So, I began researching the continuous brew method of making kombucha. I found that not only was it more time efficient, but it also makes better quality kombucha!
Some benefits to a Continuous brew system include:
- Less maintenance is required. You simply add new sweetened tea to begin a new batch. Cleaning is required only when the spigot is clogged with yeast sediment or too much sediment is on the bottom.
- Increased chance of successful brewing. Since the ecosystem is not disturbed, there is little chance of contamination with mold and bacteria.
- A healthier scoby is maintained. The ecosystem developed during the fermentation process is not disturbed when beginning a new batch. The yeast and bacteria are allowed to ferment undisturbed.
- Consistency in supply is achieved. You may choose to take off small amounts of kombucha at more frequent intervals or do it all at once.
As I will show you shortly in my step by step tutorial, the continuous brewing method requires no direct contact with the scoby. This means you avoid contamination of the scoby. Remember the scoby (also called starter or mushroom) is reused from one batch to the next and consists of yeast and bacteria which live together in a symbiotic relationship. SCOBY is an acronym for Symbiotic Colony of Bacteria and Yeast.
2 Methods of Continuous Brew Kombucha
There are two ways to do a continuous brew.
- Removing small amounts at more frequent intervals – this can be removing enough kombucha for one day or for one week.
- Allowing the kombucha to ferment for 2 – 4 weeks (depending on the quanitity and taste desired) then removing 80% of the container contents and beginning a new batch.
I do the latter. While kombucha is naturally slightly fizzy, we put ours in a kegerator and have it on tap for the children to enjoy at will. Don’t worry though, if you do not keg your kombucha, simply put it in the refrigerator and enjoy!
A couple of notes to insure success:
- Make sure to use non-chlorinated water as chlorine will kill the scoby.
- The scoby needs sugar to live on – honey, rapadura or sugar substitutes will not work.
Equipment Needed:
1. Container – For continuous brewing, the container should be between 1 – 5 gallons in capacity – this should be glass or porcelain. Do not use ceramic, plastic, crystal or metal which are detrimental to the scoby.
2. Spigot – The spigot should be near the bottom of the container. The purpose is to draw off kombucha from the bottom without disturbing the contents at the top and the scoby which floats on top. Be sure to check for a tight seal – you don’t want your kombucha leaking!
3. Cover – The cover should fit snug to keep dust, bacteria (such as, yeast) and critters (like fruit flies) out while allowing the gas of fermentation to escape. If the container does not have a cover, use a tightly woven towel and secure with a rubber band.
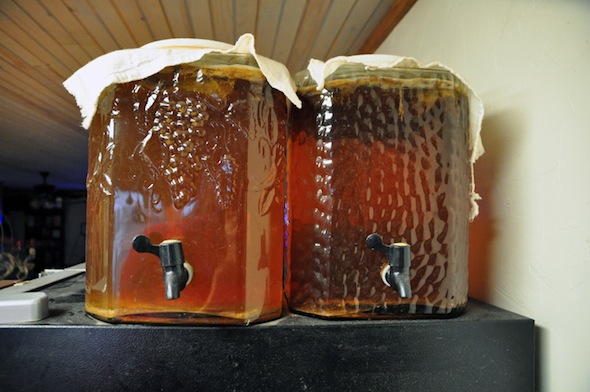
My Continuously Brewing Kombucha
I use two 4.75 gallon glass beverage dispensers – that’s right, I have over 8 gallons of kombucha brewing at a time! I also use a tea towels secured with a rubber band as lids. When I started the continuous brewing system, I used two 3 gallon plastic tea dispensers. Not only were they plastic (which lile metal are not healthy for the scoby!), the lids popped up during the fermentation process. This allowed fruit flies in which contaminated my scobies – YUCK – don’t make the same mistake – choose your equipment carefully!
I will give the basic kombucha recipe which can be multiplied to fit any quantity and then show you how I do subsequent batches.
Kombucha Tutorial – Getting Started:
Kombucha Recipe for 1 gallon
- 13 cups water (non-chlorinated)
- 2 Tbsp. loose organic tea or 8 tea bags
- 1 c. sugar
- 2 c kombucha from a previous batch
- 1 kombucha scoby
Preparation:
- Be sure all equipment is clean and rinse thoroughly so no traces of soap remain – you may also use vinegar to clean your equipment.
- Brew the tea by bringing water to a boil and adding the tea bags. Allow the tea to steep until cool and remove the tea bags.
- Add sugar to the tea and stir until dissolved.
- Allow to cool to room temperature. This is very important as hot tea will kill the scoby.
- Place the kombucha from a previous batch and the sweetened tea into the continuous brew container.
- Add the scoby.
- Put a piece of cheesecloth over the top of the jar and secure with a rubber band – this allows air in but keeps bugs and dust out.
- Place the jar in an out of the way place and allow to ferment
- If your kitchen is warm, the kombucha will ferment more quickly, so for the first batch, taste it after a few days. Once the taste is to your liking, follow the steps below.
Subsequent Batches:
Prepare the tea as above, sweeten and allow to cool completely.
Drain the fermented kombucha into the desired container. Since we keg ours, we use clean tubing and drain it directly into the keg. My containers are on top of the refrigerator and this allows them to be emptied without moving. The tubing used is food grade and does not come into contact with the scoby.

Leave about 20% of the batch in the container to use for the next batch. You can see the layers of the scoby, as well as, the yeast sediment in the bottom.

Now you are ready to refill the container with new sweetened tea to feed the scoby. Add the tea gently. I pour it right on top of the scoby which may sink or be pushed down during this process but always rises to the top again. There is no need to mix the new tea mixture with the amount left from the previous batch, the fermentation process takes care of this!

Cover the top with a lid or tightly woven cloth and secure with a rubber band. Allow the fresh batch 10 days to 3 weeks to ferment. The time will depend on the batch size and the size of your scoby. Taste the kombucha every week or so until the desired taste is acquired.

Enjoy!

Dina-Marie is the author of Cultured Palate blog and the mom of 10 children, 7 of whom are still at home. Moving to West Texas to begin a vineyard has brought many changes among them being a return to health through the GAPS diet, learning about “real” food and becoming a chapter leader for the Weston A. Price Foundation. Dina-Marie began Cultured Palate because of her passion to spread the healing potential of real traditional food and to encourage others with a nutrient dense diet and simple family life.
Where to Buy Organic Kombucha and Kombucha Making Supplies
This post is share at: My Meatless Monday, Melt in Mouth Monday, Barnyard Hop, Meatless Monday, Slightly Indulgent Tuesday, Hearth & Soul Hop, Real Food Wednesday, Gluten Free Wednesday, Mommy Club, Healthy 2 Day, Party WaveWednesday, Wild Crafting Wednesday, Allergy Free Wednesday, Seasonal Celebration, Creative Juice Thursday, Full Plate Thursday, Simple Lives Thursday, Thank Your Body Thursday, Keep it Real Thursday, Gluten Free Friday, Fight Back Friday, Foodie Friday, Small Footprint Friday